Follow these steps to effectively winterize your splash pad.

There comes a time at the end of every summer when temperatures begin to cool, night arrives a little earlier, and the water spray at the splash pad gets turned off for the year.
When the crowds have left, it’s time for an important step in splash pad maintenance: winterization.
Winterization is a necessary part of splash pad maintenance anywhere temperatures dip below freezing. A thorough winterization ensures that no damage to equipment gets caused by ice formation.
All Aquatix splash pad owners receive information on the winterization process. If you have questions that this article or your Aquatix documentation doesn’t answer, don’t hesitate to contact us.
When is the right time to winterize?

Don’t wait until the frost begins.
Not only can service providers (if needed) book up quickly, but there’s no reason to wait on winterization once your pad is closed for the season.
Live in a warmer climate? A seasonal shutdown is still worth planning. Draining the system, inspecting equipment and addressing any maintenance needs can help prevent stagnant water accumulation and ensure you’re ready-to-go when spring arrives.
Have the right tools on hand
To winterize effectively, you’ll need:
- Winterization instructions (provided by Aquatix)
- OEM documentation
- Shop vac
- Air compressor
- Blow-out adapters or fittings
- Spanner wrench (provided by Aquatix)
- Biodegradable antifreeze
- Winterization covers (provided by Aquatix)
- Anti-seize
- 5/32″ security hex bit
- 9/16” deep well socket
Most of these items, if not provided by Aquatix, can be found at a local hardware store.
Winterization steps by system type
Domestic System
Since a domestic system doesn’t retain water by design, it is the fastest to put into winter hibernation.
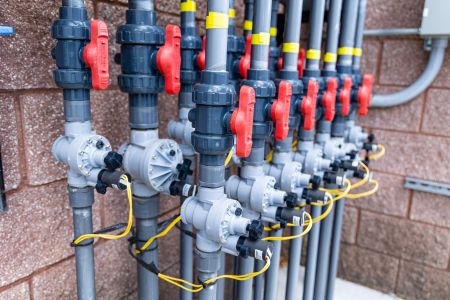
Steps (allow 4-8 hours): As with any system, ensure that the water supply and power source are shut off.
Manually open all red-handled valves and all IPV solenoids (if equipped). Open the drain-down valves or drain port(s) on the manifold. Once opened, the manifold and connected piping should gravity drain back to the drain pit or below-ground vault.
If necessary, use compressed air to blow out the manifold and remove any remaining water from the play equipment and piping.
Pour biodegradable antifreeze into the plumbing lines to prevent ice formation, and swap out the nozzles on ground sprays with winter caps.
HydroLogix® System
Post-season shutdown for HydroLogix® is a bit different than for a conventional domestic system.
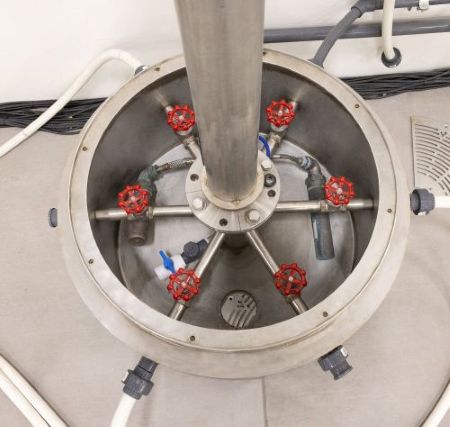
Steps (allow 2-4 hours): After shutting off the water supply and removing the battery from the Hunter NODE timer, manually open all feature supply line valves to the fully open position. At the bottom of the collection tank, open the white and blue utility ball valve to allow all feature lines to gravity drain.
To blow out the HydroLogix system, remove the brass Granzow valve and install an expandable rubber plug in its place. Remove the plug located on top of the drain valve and install an air-compressor blowout fitting. Apply compressed air (not to exceed 25-30 PSI) to evacuate any remaining water from the feature piping and manifold. Continue blowing out the system until all water has been discharged from the lines.
Leave all feature supply line valves and utility ball valve in the open position throughout the winter to prevent water from becoming trapped inside.
Finally, pour biodegradable, non-toxic antifreeze into each ground spray until antifreeze is visible at the utility ball valve discharge. Close the utility ball valve discharge to retain anti-freeze in the supply lines. Leaving the antifreeze in the lines throughout the winter is an acceptable method of freeze protection.
Recirculation System and MecH2O®

If you have a recirculation system or a MecH2O®, plan to hire an experienced professional for a safe and effective winter shutdown, as these systems are more complex than single-pass-through options.
Expect your maintenance professional to blow out or gravity-drain the supply lines, drain the pumps, filters and UV equipment. They will need to remove and store the chemical-controller probes, drain the water tank and shut off the power source.
It is a good idea to monitor your chlorine usage before shutting down your splash pad, as chlorine freezes at 20°F (-7°C) and will have lost its potency by next season. As with other systems, ground sprays will receive their winter cover and all applicable equipment will get a healthy dose of antifreeze.
For best winterization results, follow these DOs and DON’Ts:
DO:
- Follow the specified procedure for your water delivery system, as the process for each system type varies
- Hire an experienced maintenance professional when recommended
- Stay under 30 PSI air pressure when blowing out plumbing
- Move from right to left when blowing out the manifold, and always have at least five valves open (for example: Open valve 6 and close valve 1. Open valve 7 and close valve 2…)
- Scan the QR code attached to every Aquatix control panel or contact us for assistance
DON’T:
- Waste your time covering splash play features. Aqua play equipment is highly resistant to cold temperatures and winter conditions as-is.
- Waste your time covering non-flush-mount nozzles, as not all nozzles accumulate enough water to freeze. If your spray nozzle needs a winter plug, we’ve provided it.
Winterization is a vital component of your splash pad maintenance plan, and a key part of the behind-the-scenes work that ensures the fun continues summer after summer.
Questions on winterization? Contact us!
Brandon Holland, Field Service Manager at Aquatix®, spends much of his time traveling to splash pad sites, training customers on maintenance of their new play space. These winterization tips come from years of experience conducting safe and efficient seasonal shut-downs.
